
Setting up an offer - Events
FuseClick provides multiple events for the offers. This unique feature enables you to track different types of conversions such as Downloading or Installing App, Registration, Purchasing and manage the relationships among different events to put them in a consecutive order. For Multiple Event integration please refer to < Tracking offer multi-events >
1. Create Multiple Events
Running the offer starts with the initial event where will be all traffic directed to. According to your offer specification you can add up to 10 events within one offer.
You can easily get the Registration Rate, Stay Rate and other statistics based on the CR (Conversion Rate) of each events.
Event Information
(1) Event Name: Initial Event – is a default name of the first event for each offer
(2) Description: It is a description of the event. If the event is set as ‘private event’, Affiliate could not see it the the offer detail page.
(3) Event Status: Active/Inactive
Active: An Active event means that FuseClick will track and record the conversions of it. Status for the initial event is always Active, while all later events can be modified.
Inactive: An Inactive event means it is not allowed to be tracked. The conversions to an inactive event are not able to be recorded.
(4) Event Token: The Unique Identification of the Event to identify each particular event conversion.
Event Token is not required for the initial event. In case of multiple events, the event token should be unique for each event.
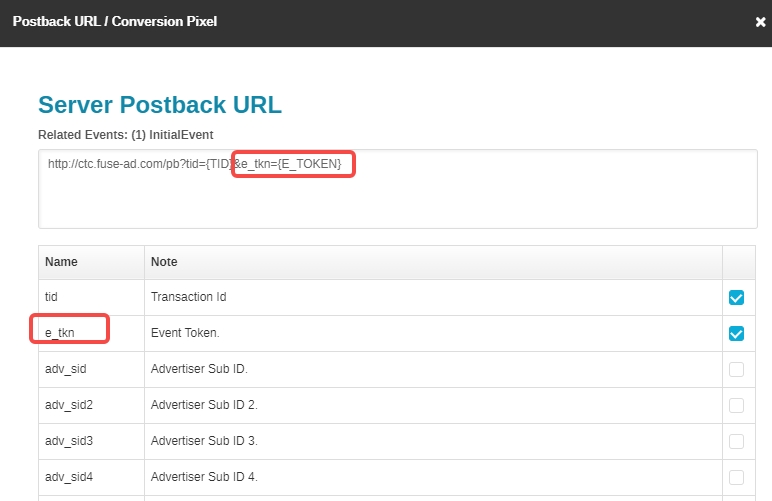
(5) Conversion Tracking Protocol: FuseClick supports 3 types of web/mobile tracking technologies – iFrame Pixel, Image Pixel and Server Postback URL.
We suggest you to use Server Postback URL. Since Pixels may not work if internet users clears their cookies.
A. Make sure the Offer URL that you set up in an offer contain the macro {TID}.
B. The Postback URL which you provide to advertiser should be correct and includes ‘tid’ and ‘e_tkn’ parameters. And the system using by advertiser should support to
pass the values of ‘tid’ and ‘e_tkn’ to FuseClick. There is one example for the Postback URL as bellow:
http://networkid.fusetracking.com/pb?tid={MacroInAdvertiserSystem }&e_tkn={MacroInAdvertiserSystem}
If there is only Initial Event within an offer, Event Token is not required.
(6) Private Event: If an event is marked as a private event, it is not visible to Affiliates.
Initial Event is not able to be set as a private event.
(7) Revenue Model:
Revenue Model means the pricing model that you will receive the commission from advertiser when a predetermined user behavior happened.
All revenue pricing models are as below:
A. RPA: Stands for Revenue per action, which means that you earn a FIXED amount from Advertiser for a specific user action: downloading, installation or purchase, etc.
B. RPC: Stands for Revenue per click, which means that you earn a FIXED amount from Advertiser for a user click.
C. RPI: Stands for Revenue per install, which means that you earn a FIXED amount from Advertiser for a user install.
D. RPS: Stands for Revenue per sale, which means that you earn a fix percentage of an advertisement according to each sale.
E. RPA + RPS: Stands for Revenue per action + Revenue per sale. According to this model Network gets paid both FIXED revenue for actions and percentage revenue for sales.
(8) Payout Model:
Payout Model means the pricing model that you will pay commission to publishers for a predetermined user behavior.
Now FuseClick has 5 Payout Models as below:
A. CPA: Stands for Cost per action, which means that you pay Affiliate for a FIXED amount foron a user action: downloading, installation or purchase.
B. CPC: Stands for Cost per click, which means that you pay Affiliate a FIXED amount for a user click.
C. CPI: Stands for Cost per install, which means that you pay Affiliate a FIXED amount for a user install.
D. CPS: Stands for Cost per sale, which means that you pay Affiliate a fix percentage according to each sale.
E. CPA + CPS: Stands for Cost per action + Cost per sale. According to this model Network pays Affiliate both FIXED amount for actions and percentage commission for sales.
Advanced: You can do more payout configurations for affiliates in Further Payout. You can set payout for affiliates in one tier, it is called Payout Tier in FuseClick. Also you can set payout for specific affiliates, we call it Special Payout.

(FIG1. In case there is only initial payout in an offer, 'Advanced' in Event tab)

(FIG2. In case there are multiple events in an offer, 'Advanced' in Event list)
(9) Smart Price: Set different price for different countries and different device OS. Details please refer to < Settings up an offer - Smart Price >.
If you set up the following Payout type at the same time, payout types can be ranked according to the priority level as follow:
From highest priority to lowest priority is: Special Payout > Payout Tiers > Smart Price > Default Payout.
For example:
a. You configured a special payout for affiliate A. Affiliate A is also in Payout Tier “BEST Affs”. Affiliate A’s payout of the event will be the value of the special payout for him/her.
b. Now you remove the special payout for affiliate A, Affiliate A is also in Payout Tier “BEST Affs”. Affiliate A’s payout of the event will be the value of the payout tier which he/she belongs to.
c. Now you remove the special payout for affiliate A , and set value of the payout tier as blank or turn off Payout Tier, and you set the rule of the smart price. If the Affiliate A's traffic is matched the rule of smart price, after conversion, the Affiliate A’s payout of the event will be the value of the smart price. If the Affiliate A's traffic isn't matched the rule of the smart price, Affiliate A’s payout of the event will be the value of the default payout.
(10) Multiple Conversions: Turn it ON to allow the event being converted multiple times
(11) Need Approval: Turn it ON to mark the event’s conversions status as Pending. You can modify this status in Conversion Report. Pending conversion records are not visible for affiliates.
(12) Conversion Point: This value notifies your affiliate about the conversion action, by which conversion gets recorded successfully. You can manage your point in Offer Conversion Points.
All multiple events of the offer can be managed in event list. You can add 10 events in one offer.
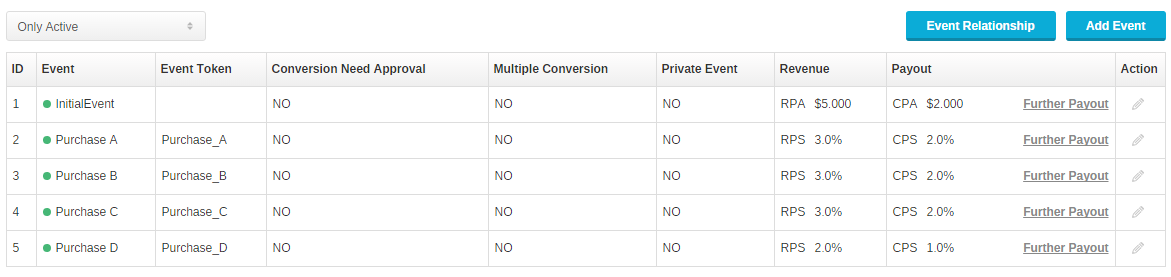
(FIG3. Manage Multiple Event in an offer)
2. Manage Event Relationships & Customize Event Conversion Rate
You can drag events (except the initial event) to set event relationship. Once set, the tracking process will execute strictly according to your settings. The post-event must be converted only after pre-event has converted.
End point must be a leaf node of the event tree. You can set a leaf node as an end point by selecting checking the checkbox. If an end point converted as Approved or Pending, no more events could be converted until a new traffic (A new transaction id is generated) come into the offer. For example, there is an offer that a mobile game names “Fly Bird”. It has 3 events as below:
(1) Install
(2) Sign up
(3) Uninstall
Event Relationships:
“Install” is the Initial Event;
“Signup” and “Uninstall” are post-events of Install;
“Uninstall” is an end point in the event tree;
Traffic flow:
User A installed the game but did not Sign up to the App. User uninstalled the App. Now if event “Sign up” happens FuseClick will detect it as a fraud conversion.
Network can set the numerator of Conversion Rate for events except the initial one. The numerator can be the number of clicks or the number of initial event conversions.
For Multiple Event integration please refer to < Tracking offer multi-events >
1. Create Multiple Events
Running the offer starts with the initial event where will be all traffic directed to. According to your offer specification you can add up to 10 events within one offer.
You can easily get the Registration Rate, Stay Rate and other statistics based on the CR (Conversion Rate) of each events.
Event Information
(1) Event Name: Initial Event – is a default name of the first event for each offer
(2) Description: It is a description of the event. If the event is set as ‘private event’, Affiliate could not see it the the offer detail page.
(3) Event Status: Active/Inactive
Active: An Active event means that FuseClick will track and record the conversions of it. Status for the initial event is always Active, while all later events can be modified.
Inactive: An Inactive event means it is not allowed to be tracked. The conversions to an inactive event are not able to be recorded.
(4) Event Token: The Unique Identification of the Event to identify each particular event conversion.
Event Token is not required for the initial event. In case of multiple events, the event token should be unique for each event.
(5) Conversion Tracking Protocol: FuseClick supports 3 types of web/mobile tracking technologies – iFrame Pixel, Image Pixel and Server Postback URL.
We suggest you to use Server Postback URL. Since Pixels may not work if internet users clears their cookies.
A. Make sure the Offer URL that you set up in an offer contain the macro {TID}.
B. The Postback URL which you provide to advertiser should be correct and includes ‘tid’ and ‘e_tkn’ parameters. And the system using by advertiser should support to
pass the values of ‘tid’ and ‘e_tkn’ to FuseClick. There is one example for the Postback URL as bellow:
http://networkid.fusetracking.com/pb?tid={MacroInAdvertiserSystem }&e_tkn={MacroInAdvertiserSystem}
If there is only Initial Event within an offer, Event Token is not required.
(6) Private Event: If an event is marked as a private event, it is not visible to Affiliates.
Initial Event is not able to be set as a private event.
(7) Revenue Model:
Revenue Model means the pricing model that you will receive the commission from advertiser when a predetermined user behavior happened.
All revenue pricing models are as below:
A. RPA: Stands for Revenue per action, which means that you earn a FIXED amount from Advertiser for a specific user action: downloading, installation or purchase, etc.
B. RPC: Stands for Revenue per click, which means that you earn a FIXED amount from Advertiser for a user click.
C. RPI: Stands for Revenue per install, which means that you earn a FIXED amount from Advertiser for a user install.
D. RPS: Stands for Revenue per sale, which means that you earn a fix percentage of an advertisement according to each sale.
E. RPA + RPS: Stands for Revenue per action + Revenue per sale. According to this model Network gets paid both FIXED revenue for actions and percentage revenue for sales.
(8) Payout Model:
Payout Model means the pricing model that you will pay commission to publishers for a predetermined user behavior.
Now FuseClick has 5 Payout Models as below:
A. CPA: Stands for Cost per action, which means that you pay Affiliate for a FIXED amount for
B. CPC: Stands for Cost per click, which means that you pay Affiliate a FIXED amount for a user click.
C. CPI: Stands for Cost per install, which means that you pay Affiliate a FIXED amount for a user install.
D. CPS: Stands for Cost per sale, which means that you pay Affiliate a fix percentage according to each sale.
E. CPA + CPS: Stands for Cost per action + Cost per sale. According to this model Network pays Affiliate both FIXED amount for actions and percentage commission for sales.
Advanced: You can do more payout configurations for affiliates in Further Payout. You can set payout for affiliates in one tier, it is called Payout Tier in FuseClick. Also you can set payout for specific affiliates, we call it Special Payout.
(FIG1. In case there is only initial payout in an offer, 'Advanced' in Event tab)
(FIG2. In case there are multiple events in an offer, 'Advanced' in Event list)
(9) Smart Price: Set different price for different countries and different device OS. Details please refer to < Settings up an offer - Smart Price >.
If you set up the following Payout type at the same time, payout types can be ranked according to the priority level as follow:
From highest priority to lowest priority is: Special Payout > Payout Tiers > Smart Price > Default Payout.
For example:
a. You configured a special payout for affiliate A. Affiliate A is also in Payout Tier “BEST Affs”. Affiliate A’s payout of the event will be the value of the special payout for him/her.
b. Now you remove the special payout for affiliate A, Affiliate A is also in Payout Tier “BEST Affs”. Affiliate A’s payout of the event will be the value of the payout tier which he/she belongs to.
c. Now you remove the special payout for affiliate A , and set value of the payout tier as blank or turn off Payout Tier, and you set the rule of the smart price. If the Affiliate A's traffic is matched the rule of smart price, after conversion, the Affiliate A’s payout of the event will be the value of the smart price. If the Affiliate A's traffic isn't matched the rule of the smart price, Affiliate A’s payout of the event will be the value of the default payout.
(10) Multiple Conversions: Turn it ON to allow the event being converted multiple times
(11) Need Approval: Turn it ON to mark the event’s conversions status as Pending. You can modify this status in Conversion Report. Pending conversion records are not visible for affiliates.
(12) Conversion Point: This value notifies your affiliate about the conversion action, by which conversion gets recorded successfully. You can manage your point in Offer Conversion Points.
All multiple events of the offer can be managed in event list. You can add 10 events in one offer.
(FIG3. Manage Multiple Event in an offer)

2. Manage Event Relationships & Customize Event Conversion Rate
You can drag events (except the initial event) to set event relationship. Once set, the tracking process will execute strictly according to your settings. The post-event must be converted only after pre-event has converted.
End point must be a leaf node of the event tree. You can set a leaf node as an end point by selecting checking the checkbox. If an end point converted as Approved or Pending, no more events could be converted until a new traffic (A new transaction id is generated) come into the offer. For example, there is an offer that a mobile game names “Fly Bird”. It has 3 events as below:
(1) Install
(2) Sign up
(3) Uninstall
Event Relationships:
“Install” is the Initial Event;
“Signup” and “Uninstall” are post-events of Install;
“Uninstall” is an end point in the event tree;
Traffic flow:
User A installed the game but did not Sign up to the App. User uninstalled the App. Now if event “Sign up” happens FuseClick will detect it as a fraud conversion.
Network can set the numerator of Conversion Rate for events except the initial one. The numerator can be the number of clicks or the number of initial event conversions.
For Multiple Event integration please refer to < Tracking offer multi-events >
Close All
Getting Started
Anti-Fraud System
Auto
SmartLlink
Configuration Guide
Integration with FuseClick
Partner Integration with FuseClick
Employees
Advertisers
Offers
Affiliates
Campaigns
Reports
Billings
Tools
Test
Setup


