
Affiliate Panel Settings
You can find affiliate related settings in “Setup > Settings > Affiliate Panel Settings”. Here you can set Terms & Conditions which affiliate has to confirm before sign up in Network, special questions for offer approval, affiliate default invoice frequency and so on.
1. Basic Settings
1.1 Terms & Conditions.
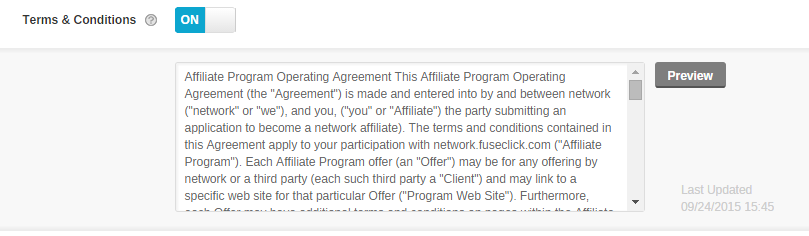
(Figure 1:Set Terms & Conditions)
You can set conditions for affiliates in “Terms & Conditions”. After saving, this function will be added into the system:
(1)When affiliates sign up in your Network, they must read and agree the “Terms & Conditions”.

(Figure 2:“Terms & Conditions” field appears when affiliates sign up)
(2)Once affiliate signs in the system, he can check “Terms & Conditions” by clicking “Support” in the top right corner.
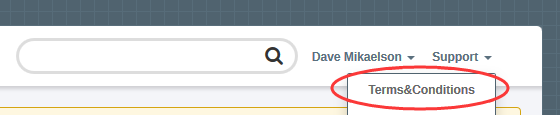
(Figure 3:Read “Terms & Conditions” after affiliates logged in)
(3)In case if Terms and Conditions has been changed, Affiliate will be asked for one more conformation after he logs in.
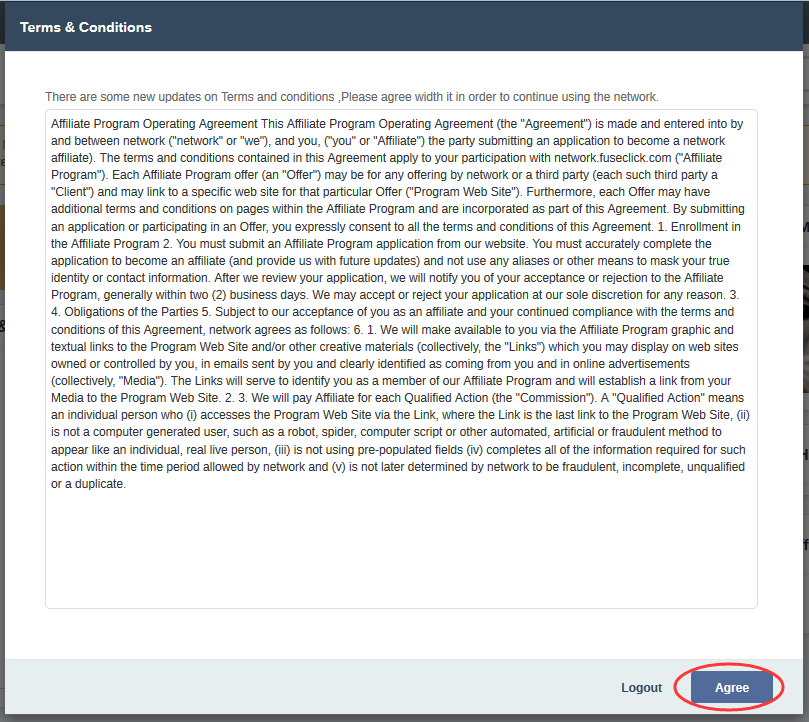
(Figure 4:In case affiliate wants to use his end, he will be asked for one more conformation after he loges in)
(4)Turn “Terms & Conditions” button off, if you don’t want affiliates to see this while signing or logging into the system.
1.2 Affiliate Sign Up

(Figure 5:Set affiliate registration status)
You can choose one out of three Affiliate sign up status:
(1)Require Approval:Affiliates can sign up by themselves, but you have to approve them.
(2)Auto Approve:Affiliates can sign up by themselves and be approved automatically.
(3)Disabled:Affiliate cannot sign up by themselves.
1.3 Auto-Assign Affiliate Manager
Go to “Setup > Settings > Affiliate Panel Settings” and turn “Auto-Assign Affiliate Managers” ON. When affiliates sign up, the system will assign manager automatically. If it is turned OFF - manager will not be assigned automatically.

(Figure 6:Assign manager to affiliate automatically)
If you have a lot of applications, we suggest you to turn it ON and let the system assign manager automatically.
1.4 Questions for Affiliate Sign Up
You can set up to 20 questions for affiliates to be answered while they signing up. According to your requirements, you can select a list of compulsory questions and mark them as a “Required”.

(Figure 7:Set a list of compulsory questions to be answered)
After saving, these questions will be shown on affiliate sign up page as below:

(Figure 8:Questions will be displayed on the affiliates sign up page)
You can see affiliate’s answers in Affiliate Manage page. According to answers received, you can approve or deny the application.

(Figure 9:Check answers in Affiliate Manage page)
2. Offer Application Questions
Go to “Setup>Setting>Affiliate Panel Setting”, you can set questions for offer application as below:

(Figure 10:Set questions for affiliates when they are applying to generate an offer tracking link)
Offer Application Questions apply to all “Need Approval” offers. If affiliate wants to generate the tracking link of “Need Approval” offer, he has to submit his answers first. You can review all answers and make a decision whether to approve or refuse the application.
3. Affiliate Billing Settings
3.1 Default Invoice Frequency
You can set the default invoice frequency for new affiliates as below:

(Figure 11:Set the default invoice frequency for new affiliates)
FuseClick system provides 6 options:
(1)Weekly:Create invoice for affiliate each week;
(2)Two Weeks:Create invoice for affiliate once in two weeks;
(3)Monthly:Create one invoice for affiliate each month;
(4)Two Months:Create one invoice for affiliate in two months;
(5)Quarterly:Create one invoice for affiliate each quarter;
(6)Manually:Create invoice manually, according to the agreement with affiliate.
Please pay attention: changes take effect only for those affiliates, who will register an account or is created accounts by AM after this type of frequency has been set.
For those affiliates, who already fixed his frequency settings, invoice rule will not be changed.
In order to meet the flexible requirements, you can set an invoice frequency for any individual affiliate, specific steps as below:
(1)Choose Affiliate in Affiliate Manage page:

(Figure 12:Click affiliate name to enter the detail page)
(2)Go to the details page and click “Billing Preferences”.
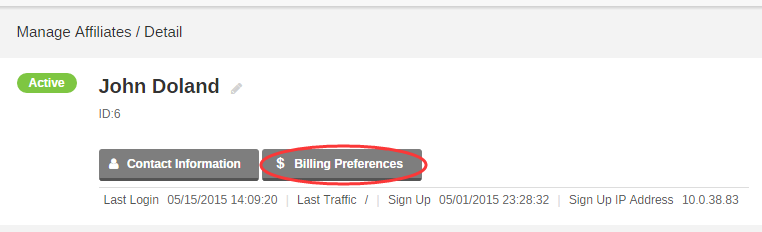
(Figure 13:Billing Preferences Settings)
(3)Open “Billing Preferences”, then Invoice Frequency.

(Figure 14:Invoice frequency options for individual affiliate)
(4)Once you save it, affiliates can see this information on their end under payment info.
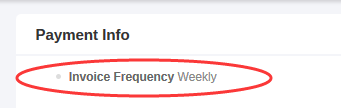
(Figure 15:Affiliates can check invoice frequency after they logged in)
3.2 Generate Invoice for affiliate automatically(Auto Generate Invoice By Frequency)
Along with manual invoice generation, FuseClick system provides automatic option. Turn it ON and check below:

(Figure 16)
(1)After you turn it ON, system will create invoice automatically according to individual affiliate invoice frequency setting. If some affiliates have been set as ‘Manually’, in this case you need create invoices manually.
(2)Check the default time zone in “Setup> Settings> General Settings”. The same time zone is applied for automatic invoice generation.
3.3 Minimum Invoice Threshold For Creating Invoice Automatically
Chose the minimum threshold for invoice generation. Once this limit is reached, system will create invoice to affiliates automatically.

(Figure 17)
(1)FuseClick system supplies 6 kind of minimum value: 25,50,100,250,500,1000. Check currency in the default settings ”Setup > Setting > General Setting”.
(2)After this settings is done, affiliates can check payment threshold under their payment info page

(Figure 18: Minimum value will be displayed in Payment Info page in affiliate end)
3.4 W-9/W-8BEN
If you need to declare tax return in America, you can mark whether get the tax return form from your affiliate or not. As below:

(Figure 19: Turn on W-9/W-8BEN for the whole system)
(1)After you received the form, you can change W-9/W-8BEN receiving status on affiliate billing preference page:

(Figure 20: In affiliate mange list, click affiliate link and go into the detail page)
(2)Find “Billing Preferences” button on affiliate detail page.
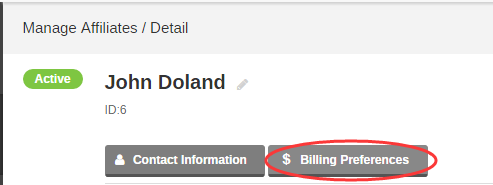
(Figure 21: Billing Preferences Settings)
(3)Go into Billing Preferences detail page, and mark whether receive the tax return form of this affiliate or not.
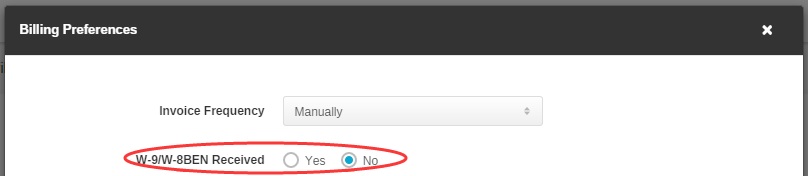
(Figure 22: Change the statue of receiving form)
(4)After you finished this settings, affiliates can check this information under their payment info page.
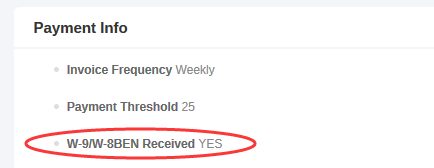
(Figure 23: Affiliate can check submission in payment info)
1. Basic Settings
1.1 Terms & Conditions.
(Figure 1:Set Terms & Conditions)
You can set conditions for affiliates in “Terms & Conditions”. After saving, this function will be added into the system:
(1)When affiliates sign up in your Network, they must read and agree the “Terms & Conditions”.
(Figure 2:“Terms & Conditions” field appears when affiliates sign up)
(2)Once affiliate signs in the system, he can check “Terms & Conditions” by clicking “Support” in the top right corner.
(Figure 3:Read “Terms & Conditions” after affiliates logged in)
(Figure 4:In case affiliate wants to use his end, he will be asked for one more conformation after he loges in)
(4)Turn “Terms & Conditions” button off, if you don’t want affiliates to see this while signing or logging into the system.
1.2 Affiliate Sign Up
(Figure 5:Set affiliate registration status)
You can choose one out of three Affiliate sign up status:
(1)Require Approval:Affiliates can sign up by themselves, but you have to approve them.
(2)Auto Approve:Affiliates can sign up by themselves and be approved automatically.
(3)Disabled:Affiliate cannot sign up by themselves.
1.3 Auto-Assign Affiliate Manager
Go to “Setup > Settings > Affiliate Panel Settings” and turn “Auto-Assign Affiliate Managers” ON. When affiliates sign up, the system will assign manager automatically. If it is turned OFF - manager will not be assigned automatically.
(Figure 6:Assign manager to affiliate automatically)
If you have a lot of applications, we suggest you to turn it ON and let the system assign manager automatically.
1.4 Questions for Affiliate Sign Up
You can set up to 20 questions for affiliates to be answered while they signing up. According to your requirements, you can select a list of compulsory questions and mark them as a “Required”.
(Figure 7:Set a list of compulsory questions to be answered)
After saving, these questions will be shown on affiliate sign up page as below:
(Figure 8:Questions will be displayed on the affiliates sign up page)
You can see affiliate’s answers in Affiliate Manage page. According to answers received, you can approve or deny the application.
(Figure 9:Check answers in Affiliate Manage page)
2. Offer Application Questions
Go to “Setup>Setting>Affiliate Panel Setting”, you can set questions for offer application as below:
(Figure 10:Set questions for affiliates when they are applying to generate an offer tracking link)
Offer Application Questions apply to all “Need Approval” offers. If affiliate wants to generate the tracking link of “Need Approval” offer, he has to submit his answers first. You can review all answers and make a decision whether to approve or refuse the application.
3. Affiliate Billing Settings
3.1 Default Invoice Frequency
You can set the default invoice frequency for new affiliates as below:
(Figure 11:Set the default invoice frequency for new affiliates)
FuseClick system provides 6 options:
(1)Weekly:Create invoice for affiliate each week;
(2)Two Weeks:Create invoice for affiliate once in two weeks;
(3)Monthly:Create one invoice for affiliate each month;
(4)Two Months:Create one invoice for affiliate in two months;
(5)Quarterly:Create one invoice for affiliate each quarter;
(6)Manually:Create invoice manually, according to the agreement with affiliate.
Please pay attention: changes take effect only for those affiliates, who will register an account or is created accounts by AM after this type of frequency has been set.
For those affiliates, who already fixed his frequency settings, invoice rule will not be changed.
In order to meet the flexible requirements, you can set an invoice frequency for any individual affiliate, specific steps as below:
(1)Choose Affiliate in Affiliate Manage page:
(Figure 12:Click affiliate name to enter the detail page)
(2)Go to the details page and click “Billing Preferences”.
(Figure 13:Billing Preferences Settings)
(3)Open “Billing Preferences”, then Invoice Frequency.
(Figure 14:Invoice frequency options for individual affiliate)
(4)Once you save it, affiliates can see this information on their end under payment info.
(Figure 15:Affiliates can check invoice frequency after they logged in)
3.2 Generate Invoice for affiliate automatically(Auto Generate Invoice By Frequency)
Along with manual invoice generation, FuseClick system provides automatic option. Turn it ON and check below:
(Figure 16)
(1)After you turn it ON, system will create invoice automatically according to individual affiliate invoice frequency setting. If some affiliates have been set as ‘Manually’, in this case you need create invoices manually.
(2)Check the default time zone in “Setup> Settings> General Settings”. The same time zone is applied for automatic invoice generation.
3.3 Minimum Invoice Threshold For Creating Invoice Automatically
Chose the minimum threshold for invoice generation. Once this limit is reached, system will create invoice to affiliates automatically.
(Figure 17)
(1)FuseClick system supplies 6 kind of minimum value: 25,50,100,250,500,1000. Check currency in the default settings ”Setup > Setting > General Setting”.
(2)After this settings is done, affiliates can check payment threshold under their payment info page
(Figure 18: Minimum value will be displayed in Payment Info page in affiliate end)
If you need to declare tax return in America, you can mark whether get the tax return form from your affiliate or not. As below:
(Figure 19: Turn on W-9/W-8BEN for the whole system)
(1)After you received the form, you can change W-9/W-8BEN receiving status on affiliate billing preference page:
(Figure 20: In affiliate mange list, click affiliate link and go into the detail page)
(2)Find “Billing Preferences” button on affiliate detail page.
(Figure 21: Billing Preferences Settings)
(3)Go into Billing Preferences detail page, and mark whether receive the tax return form of this affiliate or not.
(Figure 22: Change the statue of receiving form)
(4)After you finished this settings, affiliates can check this information under their payment info page.
(Figure 23: Affiliate can check submission in payment info)
Close All
Getting Started
Anti-Fraud System
Auto
Configuration Guide
Integration with FuseClick
Partner Integration with FuseClick
Employees
Advertisers
Offers
Affiliates
Campaigns
Reports
Billings
Tools
Test
Setup


