FraudScore Integration Instruction
With the evolution of digital marketing industry, anti-fraud draw much more attention of agencies and advertisers. Under this circumstance, FuseClick started to integrate with FraudScore for additional data security, besides our own 6-index anti-fraud method: Fraud-Campaign, Event Relationship, Limit Conversion by Unique ID, Advertiser Security Token, Prevent Bot Traffic, IP Whitelist of Postback Server. With this move, you could avoid multiple integration while get even higher standard protection.
Tips: Please get your API Key from FraudScore in advance.
1. How to set up and employ fraud-detection task
Use your FuseClick Administrator Account to log in, navigate: Tools>Fraud Detection>FraudScore to check up the campaigns been detected.
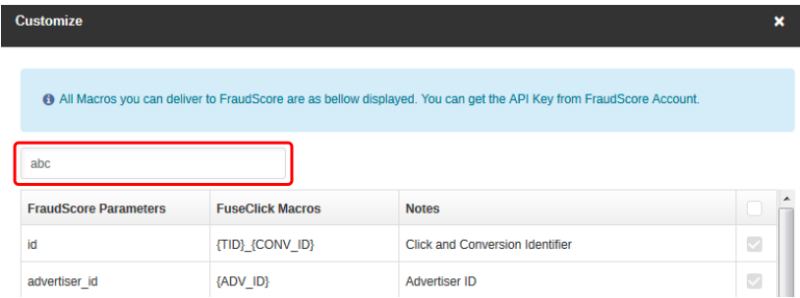
A. Click Customize in Request URL box, then you will find where to fill in your FraudScore API Key.

(Fig.1 Fill in FraudScore API Key in the red box)
B. Select the parameters of detection. Applicable parameters are in the column below, and Required parameters were already selected for you.
C. When the API Key and parameters of detection been saved, the general Request URL would be generated automatically in the Request URL box by the system.
D. By default, there would be a Detection Campaign under the Request URL box, and the Offer Event would only include Initial Event of this offer, see Fig.2, when Fraud Detect been set into Yes, Approved conversions of Initial Event would be sent to FraudScore for detection (If this conversion of Initial Event was not approved by FuseClick, it won’t be sent for detection).

(Fig.2 Detection Campaign)
2. Set Which Campaign Need to Be Detected
For your detection cost saving, we now support customized detection task of different Affiliates or Offers. And after creating them, you could also decide which of them need to be detected.
A. Click “Add Detection Campaign” to create a new detection task.

(Fig.3 Create New Detection Task)
B. You could assign one or several Affiliates into the detection task:

(Fig.4 Assign Affiliates)
C. Set Offers of this Affiliate with further step. All Offers, one offer, or several of them.

(Fig.5 Assign Offers of this Affiliate)
D. After task creation, the “Fraud Detect” switch could be turned on or off accordingly, if you want to detect the related conversions or not.

(Fig.6 Set if related conversions would be detected)
3. Login to FraudScore to review the result of detection:
A. Login FraudScore.
B. Enter Conversion Report Page.
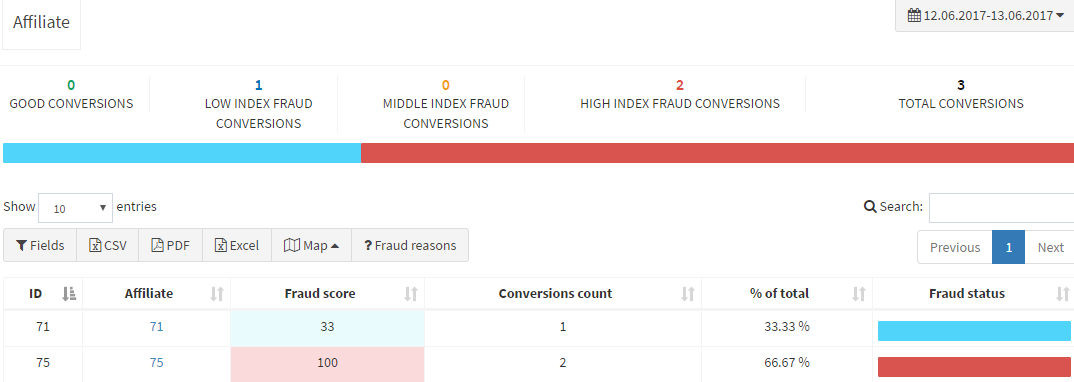
C. When data column and time range are selected, you will get the report as is shown in the picture bellow:

(Fig.3 Review Result in FraudScore)
Tips: Please get your API Key from FraudScore in advance.
1. How to set up and employ fraud-detection task
Use your FuseClick Administrator Account to log in, navigate: Tools>Fraud Detection>FraudScore to check up the campaigns been detected.
A. Click Customize in Request URL box, then you will find where to fill in your FraudScore API Key.

(Fig.1 Fill in FraudScore API Key in the red box)
B. Select the parameters of detection. Applicable parameters are in the column below, and Required parameters were already selected for you.
| # | FraudScore Parameters | Fuseclick Macros | Notes | Required |
| 1 | id | {TID}_{CONV_ID} | Click and Conversion Identifier | Yes |
| 2 | advertiser_id | {ADV_ID} | Advertiser ID | Yes |
| 3 | affiliate_id | {AFFID} | Affiliate ID | Yes |
| 4 | offer_id | {OID} | Offer ID | Yes |
| 5 | session_time | {CLICK_TIME} | Click Time | Yes |
| 6 | conversion_time | {CONV_TIME} | Conversion Time | Yes |
| 7 | session_ip | {IP} | Click IP | Yes |
| 8 | ua | {UA} | UserAgent | Yes |
| 9 | conversion_ip | {CONV_IP} | Conversion IP | No |
| 10 | refer | {CLICK_REFER} | Refer | No |
| 11 | source | {SOURCE} | Traffic Source | No |
| 12 | aff_sub1 | {S1} | Affiliate Subid 1 | No |
| 13 | aff_sub2 | {S2} | Affiliate Subid 2 | No |
| 14 | aff_sub3 | {S3} | Affiliate Subid 3 | No |
| 15 | aff_sub4 | {S4} | Affiliate Subid 4 | No |
| 16 | aff_sub5 | {S5} | Affiliate Subid 5 | No |
(Integration Parameters list)
C. When the API Key and parameters of detection been saved, the general Request URL would be generated automatically in the Request URL box by the system.
D. By default, there would be a Detection Campaign under the Request URL box, and the Offer Event would only include Initial Event of this offer, see Fig.2, when Fraud Detect been set into Yes, Approved conversions of Initial Event would be sent to FraudScore for detection (If this conversion of Initial Event was not approved by FuseClick, it won’t be sent for detection).

(Fig.2 Detection Campaign)
2. Set Which Campaign Need to Be Detected
For your detection cost saving, we now support customized detection task of different Affiliates or Offers. And after creating them, you could also decide which of them need to be detected.
A. Click “Add Detection Campaign” to create a new detection task.

(Fig.3 Create New Detection Task)
B. You could assign one or several Affiliates into the detection task:

(Fig.4 Assign Affiliates)
C. Set Offers of this Affiliate with further step. All Offers, one offer, or several of them.

(Fig.5 Assign Offers of this Affiliate)
D. After task creation, the “Fraud Detect” switch could be turned on or off accordingly, if you want to detect the related conversions or not.

(Fig.6 Set if related conversions would be detected)
3. Login to FraudScore to review the result of detection:
A. Login FraudScore.
B. Enter Conversion Report Page.
C. When data column and time range are selected, you will get the report as is shown in the picture bellow:

(Fig.3 Review Result in FraudScore)
Close All
Getting Started
Anti-Fraud System
Auto
SmartLlink
Configuration Guide
Integration with FuseClick
Partner Integration with FuseClick
Employees
Advertisers
Offers
Affiliates
Campaigns
Reports
Billings
Tools
Test
Setup


