
Forensiq Integration Instruction
Forensiq Integration with FuseClick
With the evolution of the digital marketing industry, anti-fraud draws much more attention to agencies and advertisers. Under this circumstance, FuseClick has integrated with Forensiq for additional data security, besides our in-house 6-index anti-fraud methods: Fraud-Campaign, Event Relationship, Limit Conversion by Unique ID, Advertiser Security Token, Prevent Bot Traffic, IP Whitelist of Postback Server. You just need to set up a public id (key from your Forensiq account) and detection campaign (from FuseClick platform) to start using it.
Note: Please get in touch with Forensiq team for your account and key.
Below are the simple steps to follow:
A. Go to Forensiq tab, in the upper right corner you will find a text box to fill in your Forensiq Public ID as shown in the screenshot below. Enter your key and click save.
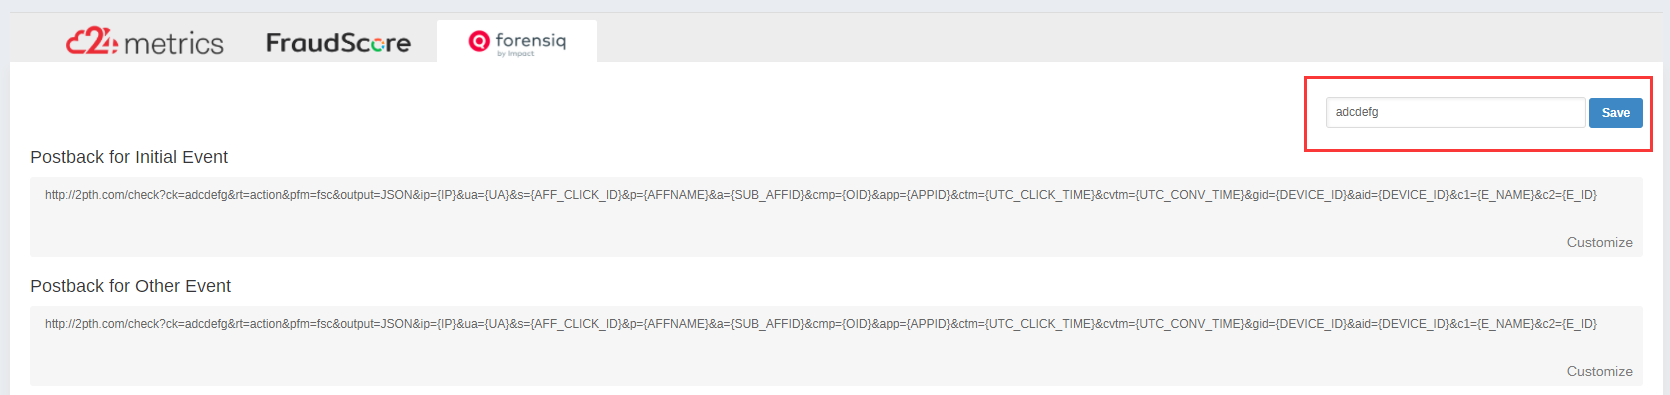
(Fig.1 Fill in Forensiq Public ID in the red box)
B. Once the Public key is saved, Request postback will be automatically generated by the system. It will appear in “Postback for Initial Event” and “Postback for other Event” text boxes.
C. You can customize the postback by adding the applicable parameters from below table as needed. Click on the “Customize” button to get the list of parameters for detection from FuseClick as well as Forensiq systems. The system will select the required/mandatory parameters by default.
A. Once the Requested URL is configured, as shown above, click on “Add Detection Campaign” to select a list of campaigns to be sent to Forensiq for fraud detection (See Fig. 2).

(Fig.2 Detection Campaign)
B. Click on Affiliates, Offers and Events drop down lists to select all or multiple items from the list as shown in Fig. 3.

(Fig.3 Assign Affiliates, Offers and Events from drop down list)
C. Set Fraud detect switch to “ON”, only the Approved events would be sent to Forensiq for detection (This means, you must approve the Event in FuseClick before using it for Fraud detection, only the approved conversions data is available for detection).

(Fig.4 Set the Fraud detect switch to “ON”)
B. Go to Conversion Report Page.
C. Choose Public ID and relevant Tracker, and time range.
D. Click Generate Report. Your report will look like below:
(Fig.5 Review Results in Forensiq system)
With the evolution of the digital marketing industry, anti-fraud draws much more attention to agencies and advertisers. Under this circumstance, FuseClick has integrated with Forensiq for additional data security, besides our in-house 6-index anti-fraud methods: Fraud-Campaign, Event Relationship, Limit Conversion by Unique ID, Advertiser Security Token, Prevent Bot Traffic, IP Whitelist of Postback Server. You just need to set up a public id (key from your Forensiq account) and detection campaign (from FuseClick platform) to start using it.
Note: Please get in touch with Forensiq team for your account and key.
Below are the simple steps to follow:
1. Set up and employ fraud-detection task
Use your FuseClick Administrator Account to log in, navigate: Tools -> Fraud Detection -> Forensiq to configure and employ the campaigns for fraud detection.A. Go to Forensiq tab, in the upper right corner you will find a text box to fill in your Forensiq Public ID as shown in the screenshot below. Enter your key and click save.
(Fig.1 Fill in Forensiq Public ID in the red box)
B. Once the Public key is saved, Request postback will be automatically generated by the system. It will appear in “Postback for Initial Event” and “Postback for other Event” text boxes.
C. You can customize the postback by adding the applicable parameters from below table as needed. Click on the “Customize” button to get the list of parameters for detection from FuseClick as well as Forensiq systems. The system will select the required/mandatory parameters by default.
| # | Forensiq Parameters | FuseClick Macros | Notes |
| 1 | ip | {IP} | Click IP |
| 2 | ua | {UA} | UserAgent |
| 3 | s | {AFF_CLICK_ID} | Affiliate Click ID |
| 4 | p | {AFFNAME} | Affiliate Name |
| 5 | a | {SUB_AFFID} | Sub Affiliate ID |
| 6 | cmp | {OID} | Offer ID |
| 7 | app | {APPID} | APP ID |
| 8 | ctm | {UTC_CLICK_TIME} | Click Time |
| 9 | cvtm | {UTC_CONV_TIME} | Conversion Time |
| 10 | gid | {DEVICE_ID} | Device ID |
| 11 | aid | {DEVICE_ID} | Device ID |
| 12 | c1 | {E_NAME} | Event Name |
| 13 | c2 | {E_ID} | Event ID |
(Integration Parameters list)
2. Set the campaign for Fraud Detected
You can select data for All Affiliates, All Offers, and Initial events/all events or combination of multiple affiliates, offers and events in one campaign.A. Once the Requested URL is configured, as shown above, click on “Add Detection Campaign” to select a list of campaigns to be sent to Forensiq for fraud detection (See Fig. 2).
(Fig.2 Detection Campaign)
B. Click on Affiliates, Offers and Events drop down lists to select all or multiple items from the list as shown in Fig. 3.
(Fig.3 Assign Affiliates, Offers and Events from drop down list)
C. Set Fraud detect switch to “ON”, only the Approved events would be sent to Forensiq for detection (This means, you must approve the Event in FuseClick before using it for Fraud detection, only the approved conversions data is available for detection).
(Fig.4 Set the Fraud detect switch to “ON”)
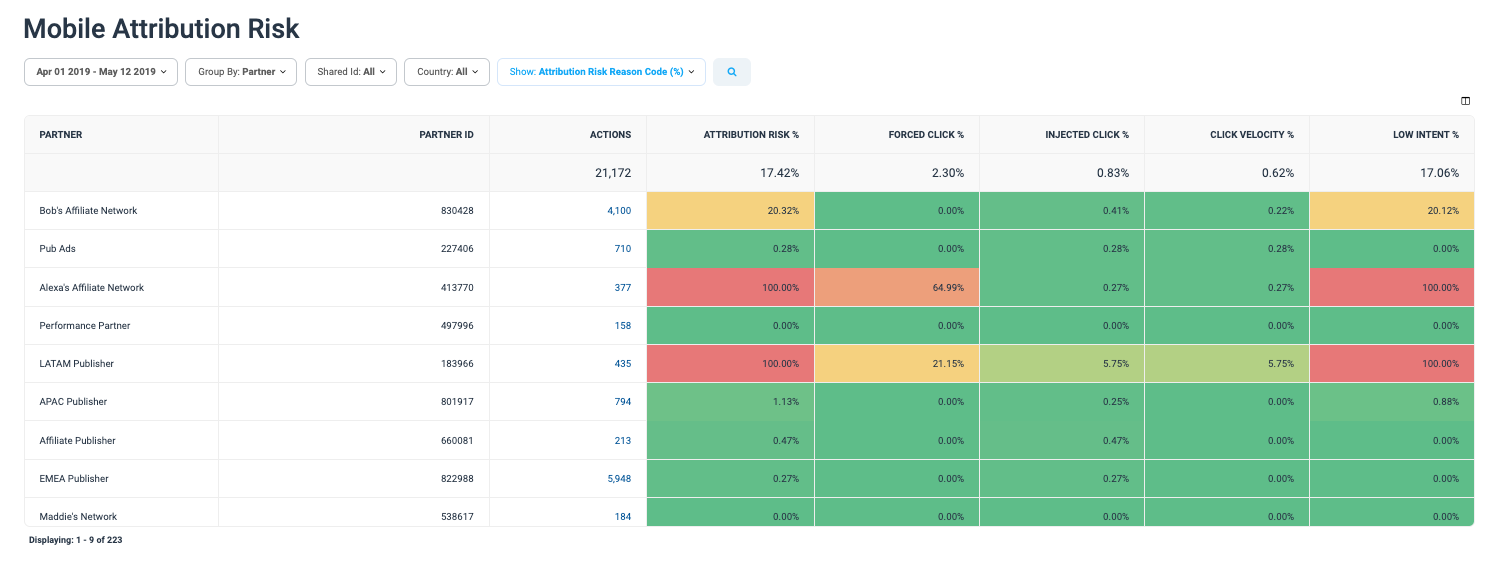
3. Login to Forensiq to review the result of detection:
A. Login to your Forensiq account.B. Go to Conversion Report Page.
C. Choose Public ID and relevant Tracker, and time range.
D. Click Generate Report. Your report will look like below:
(Fig.5 Review Results in Forensiq system)
Close All
Getting Started
Anti-Fraud System
Auto
SmartLlink
Configuration Guide
Integration with FuseClick
Partner Integration with FuseClick
Employees
Advertisers
Offers
Affiliates
Campaigns
Reports
Billings
Tools
Test
Setup


