Better enhance your business with email
In order to make the communication between you and your advertiser as well as between affiliate and employee easier, FuseClick System supplies “Send Email” tool and sends email automatically on some specific events such as offer caps reached and so on. Before you use this function, please confirm whether the SMTP service is set under “Setup > Settings > Email Settings” page, since all the send email behaviors will be based on SMTP service settings.
1. Send Email Tool
(1)Send Email
Network could use this tool to send email to: affiliates, advertisers and employees in system. Operation flow is as follows:
A. Click “New Email” button.

(Figure 1)
B. Select receivers:Affiliates, Advertisers, Employees.
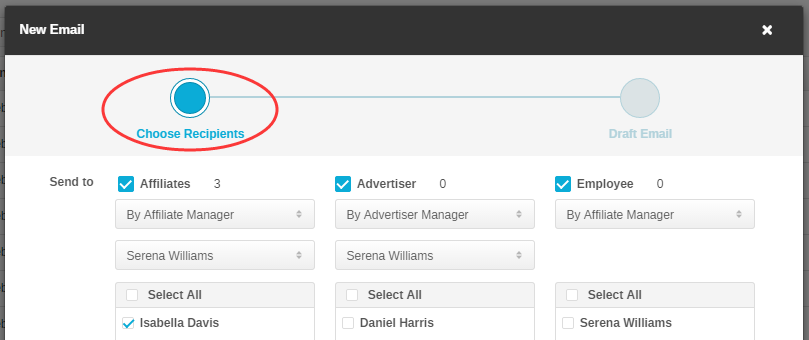
(Figure 2: Select receivers)
C. Enter email sender, send address, email subject, and message bodies. To meet the personalized needs of the Network, FuseClick System supplies 7 dynamic substitution parameters: firstname, lastname, company, data, affiliate id, advertiser id. For example: when you click “firstname”, the receiver name will be inserted in body automatically.
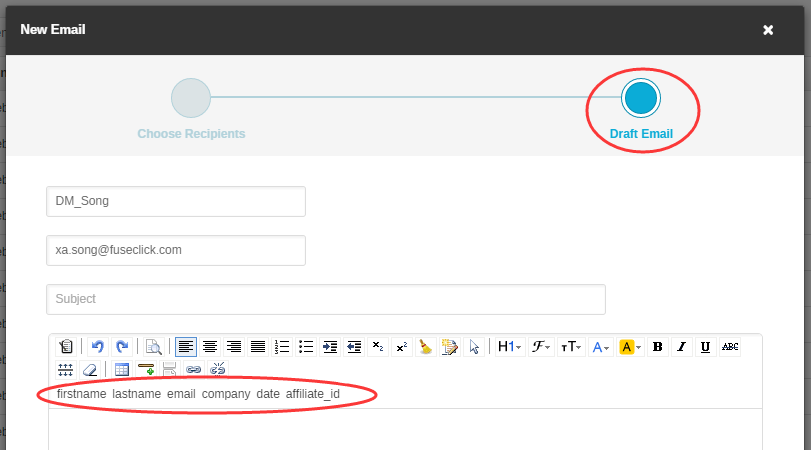
(Figure 3: Enter receiver in message body automatically when you clicking dynamic parameters)
D. Preview message content after you finished email, and send email when you make sure there is no any problems.
(2)Manage Emails
In manage email list, you can scan email sender, subject, send status, and send time. You also can filter emails by senders.

(Figure 4: Manage email)
(3)Check Emails
Click the link of subject and check email message body as below:

(Figure 5: Click subject to open email body)

(Figure 6: Check email body)
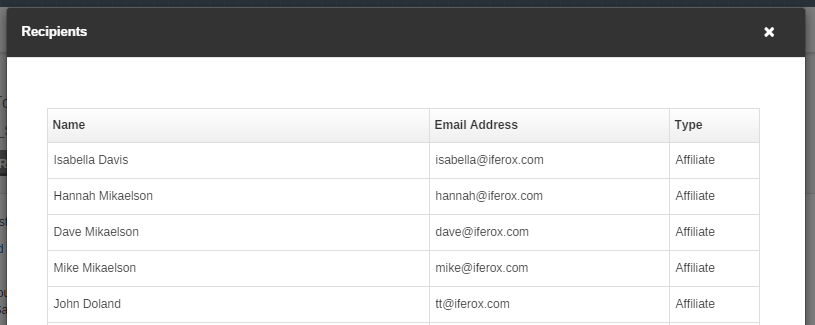
(Figure 7: Check email receiver list)
2. Notification System
(1)Set “Notification”
Go to “Setup > Settings > Notification Settings”, and set which behavior should trigger send email notification automatically. In FuseClick System, there are many events, which can trigger send email automatically. These events can be of 6 types as mentioned below:
A. SIGN UP Notification.
If you want to receive notification email when affiliate registers, you can set the below option to ON and enter the email address to receive the notification email.

(Figure 8: Turn on Notification email when affiliates registers)

(Figure 9: Enter email address which you can receive and check the email)
B. Affiliate Account Status Changed.
Once you set this option ON, you will see 5 events in the list. Select the option in “Send to” list and save it. When corresponding event gets triggered, affiliates receive the notification email. If you do not set this option and save it , affiliates won’t receive any notification email when corresponding event occurs.
For example, as below figure, if “Affiliate Pending” event is selected and affiliate is in pending status, notification email will be sent to affiliate. In case, this event is not selected and affiliate status is changed to Pending, then affiliate will not receive any notification email.
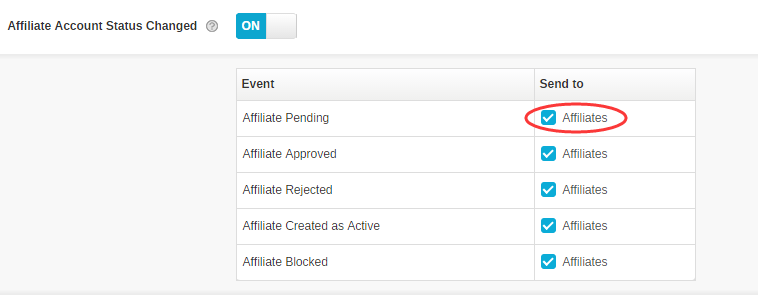
(Figure 10: Select options to set the notification email when affiliate status changed)
C. Caps:This function only has an effect on the offers for which, Offer-caps have been set.
If the below option is turned OFF, when caps reaches, no notification email will be sent.
This option has 2 parts: Once you turn ON this option, you can set Early Warning Values in 1st part and the notification receivers in 2nd part.
I. Set early warning value: Two values can be set and default of these two values is 80% and 100%.

(Figure 11: Set early warning value)
II. Set the Notification receivers:
There are 4 events, you can select the options of the receiver roles in each event.

(Figure 12: Select the options to set notification email when caps reached)
For example: one offer such as offer A for which, the Caps settings have been set to ON as shown in figure below: Using “Conversion” as caps method and network caps set to 500000. If you have selected the options Affiliates and Advertiser Manager in the event of “Offer Caps Reached” in “Figure 12” and two early warning values are 80% and 100%, then the two roles: Advertiser Manager of this offer and Affiliates which get the tracking link will receive notification email twice:
I. The first: these two roles will receive the first notification email when the conversion data of offer A reached 80% of 500000.
II. The second: these two roles will receive the second notification email when the conversion data of offer A reached 500000.

(Figure 13: The offer detail page in Offer A)
D. Offer Status Changed.
When you set this option ON, you will see 4 events in the list. Select the option in “Send to” list and save it. When the offer status in offer detail page gets changed, the corresponding event will be triggered and affiliate will receive the notification email. If this option is not set, even if the status gets changed, affiliate will not be notified for this event. For example, as below figure, the “From Active to Pause” event is selected, after the offer status changes to paused, notification email will be sent to affiliate.
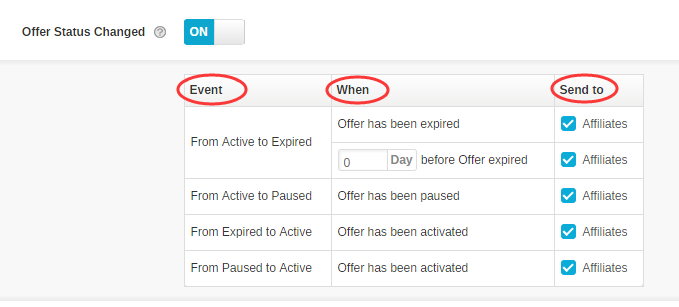
(Figure 14: Select options to set the notification email when offer status changed)
For the event of “From Active to Expired”: you can set a few days before the expiration date to send notification email as below:

(Figure 15: Set the days before the expiration data to send notification email)
E. Offer Default Payout Changed.

(Figure 16: Set the notification email when Offer Default Payout changed)
Pay attention on below information: this notification email will be sent only when payout changed under “General” tab in offer detail page. If the Payout Tier or Special Payout has been changed, there is no notification email.
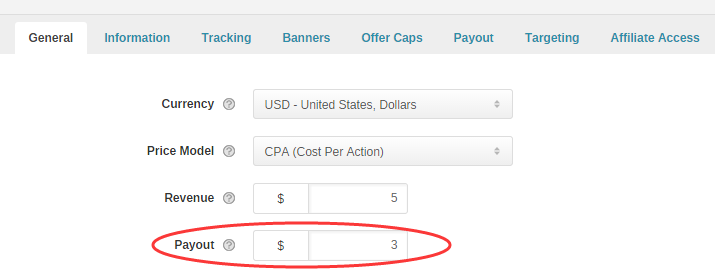
(Figure 17: Only the payout under “General” tab has been changed, the notification email will be sent to affiliates)
F. Offer Access Status of Affiliate Changed.
If you turn on this button, you will see 5 events in the list. You can launch email notifications for different events though selecting the option in “Send to” list.

(Figure 18: Select options to set notification email when offer access status of affiliate changed)
More specific explanations for Figure 18 as below:
I. Affiliate submits application to get a tracking link of “Need Approval” Offer; affiliate can receive an approved notification after you approved it in “Offers>Offer Applications” detail page.
II. Affiliate submits application to get a tracking link of “Need Approval” Offer; affiliate can receive a reject notification after you reject it in “Offers>Offer Applications” detail page.
III. Affiliate can receive a notification when Network approved this affiliate to run one offer.
IV. Affiliate can receive a notification when Network rejected this affiliate to run one offer.
V. Affiliate can receive a notification when offer access status of this affiliate has been blocked by Network or this affiliate has been added in “Unapproved Affiliate List” by Network for private offer.
1. Send Email Tool
(1)Send Email
Network could use this tool to send email to: affiliates, advertisers and employees in system. Operation flow is as follows:
A. Click “New Email” button.

(Figure 1)

(Figure 2: Select receivers)
C. Enter email sender, send address, email subject, and message bodies. To meet the personalized needs of the Network, FuseClick System supplies 7 dynamic substitution parameters: firstname, lastname, company, data, affiliate id, advertiser id. For example: when you click “firstname”, the receiver name will be inserted in body automatically.

(Figure 3: Enter receiver in message body automatically when you clicking dynamic parameters)
D. Preview message content after you finished email, and send email when you make sure there is no any problems.
(2)Manage Emails
In manage email list, you can scan email sender, subject, send status, and send time. You also can filter emails by senders.

(Figure 4: Manage email)
(3)Check Emails
Click the link of subject and check email message body as below:

(Figure 5: Click subject to open email body)

(Figure 6: Check email body)

(Figure 7: Check email receiver list)
(1)Set “Notification”
Go to “Setup > Settings > Notification Settings”, and set which behavior should trigger send email notification automatically. In FuseClick System, there are many events, which can trigger send email automatically. These events can be of 6 types as mentioned below:
A. SIGN UP Notification.
If you want to receive notification email when affiliate registers, you can set the below option to ON and enter the email address to receive the notification email.

(Figure 8: Turn on Notification email when affiliates registers)

(Figure 9: Enter email address which you can receive and check the email)
B. Affiliate Account Status Changed.
Once you set this option ON, you will see 5 events in the list. Select the option in “Send to” list and save it. When corresponding event gets triggered, affiliates receive the notification email. If you do not set this option and save it , affiliates won’t receive any notification email when corresponding event occurs.
For example, as below figure, if “Affiliate Pending” event is selected and affiliate is in pending status, notification email will be sent to affiliate. In case, this event is not selected and affiliate status is changed to Pending, then affiliate will not receive any notification email.

(Figure 10: Select options to set the notification email when affiliate status changed)
C. Caps:This function only has an effect on the offers for which, Offer-caps have been set.
If the below option is turned OFF, when caps reaches, no notification email will be sent.
This option has 2 parts: Once you turn ON this option, you can set Early Warning Values in 1st part and the notification receivers in 2nd part.
I. Set early warning value: Two values can be set and default of these two values is 80% and 100%.

(Figure 11: Set early warning value)
II. Set the Notification receivers:
There are 4 events, you can select the options of the receiver roles in each event.

(Figure 12: Select the options to set notification email when caps reached)
For example: one offer such as offer A for which, the Caps settings have been set to ON as shown in figure below: Using “Conversion” as caps method and network caps set to 500000. If you have selected the options Affiliates and Advertiser Manager in the event of “Offer Caps Reached” in “Figure 12” and two early warning values are 80% and 100%, then the two roles: Advertiser Manager of this offer and Affiliates which get the tracking link will receive notification email twice:
I. The first: these two roles will receive the first notification email when the conversion data of offer A reached 80% of 500000.
II. The second: these two roles will receive the second notification email when the conversion data of offer A reached 500000.

(Figure 13: The offer detail page in Offer A)
D. Offer Status Changed.
When you set this option ON, you will see 4 events in the list. Select the option in “Send to” list and save it. When the offer status in offer detail page gets changed, the corresponding event will be triggered and affiliate will receive the notification email. If this option is not set, even if the status gets changed, affiliate will not be notified for this event. For example, as below figure, the “From Active to Pause” event is selected, after the offer status changes to paused, notification email will be sent to affiliate.

(Figure 14: Select options to set the notification email when offer status changed)
For the event of “From Active to Expired”: you can set a few days before the expiration date to send notification email as below:

(Figure 15: Set the days before the expiration data to send notification email)
E. Offer Default Payout Changed.

(Figure 16: Set the notification email when Offer Default Payout changed)

(Figure 17: Only the payout under “General” tab has been changed, the notification email will be sent to affiliates)
F. Offer Access Status of Affiliate Changed.
If you turn on this button, you will see 5 events in the list. You can launch email notifications for different events though selecting the option in “Send to” list.

(Figure 18: Select options to set notification email when offer access status of affiliate changed)
I. Affiliate submits application to get a tracking link of “Need Approval” Offer; affiliate can receive an approved notification after you approved it in “Offers>Offer Applications” detail page.
II. Affiliate submits application to get a tracking link of “Need Approval” Offer; affiliate can receive a reject notification after you reject it in “Offers>Offer Applications” detail page.
III. Affiliate can receive a notification when Network approved this affiliate to run one offer.
IV. Affiliate can receive a notification when Network rejected this affiliate to run one offer.
V. Affiliate can receive a notification when offer access status of this affiliate has been blocked by Network or this affiliate has been added in “Unapproved Affiliate List” by Network for private offer.
Close All
Getting Started
Anti-Fraud System
Auto
SmartLlink
Configuration Guide
Integration with FuseClick
Partner Integration with FuseClick
Employees
Advertisers
Offers
Affiliates
Campaigns
Reports
Billings
Tools
Test
Setup


