
FuseClick Quick Start Guide
FuseClick is a mobile performance marketing tracking and data analyzing system. Apart from data analysis, you can also manage Advertisers, Affiliates, Offers and Multi-events, etc. in this system. Our system is built on Amazon cloud network AWS and our highly skilled technical team made a great effort on optimizing Server Nodes and Redirect Speed, especially in Southeast Asian, India, South America. We are highly committed to improve our clients’ traffic capacity and to reduce the conversion loss rate.
1. Create Advertiser
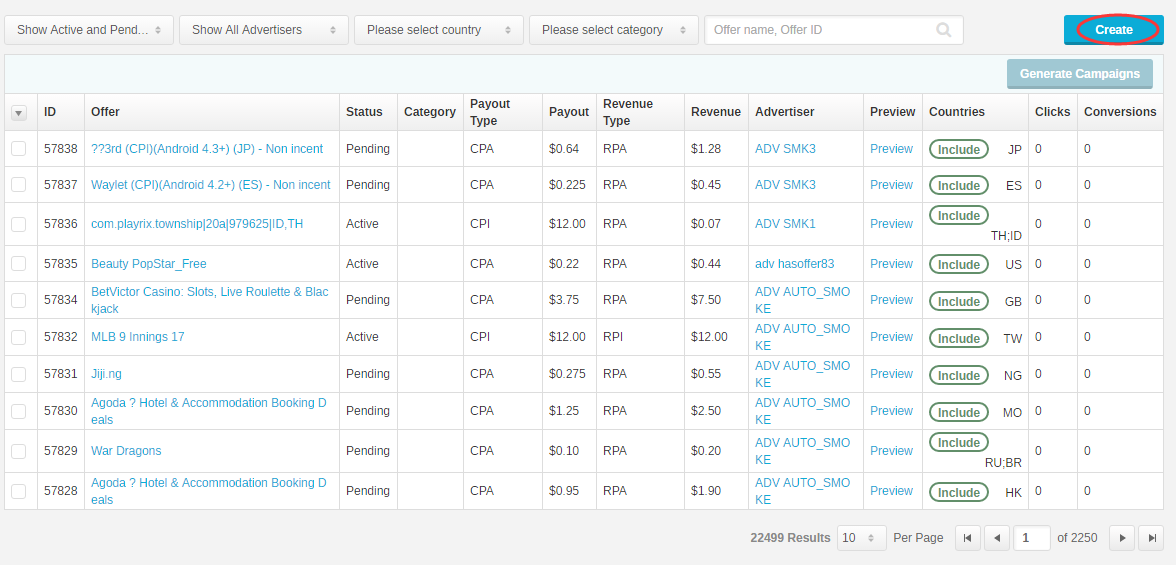
You can go to “Advertiser” management interface and click on “Create” button to create an advertiser. The steps are as follows:

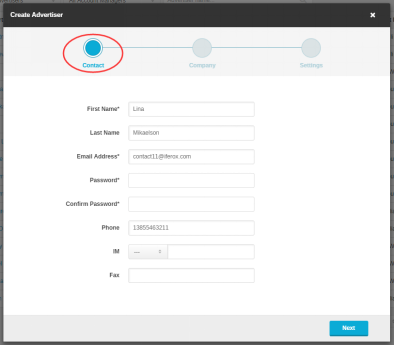
(Figure 2: Fill in Advertiser info. Only “First Name、Email、Password、Confirm Password” fields are required.)
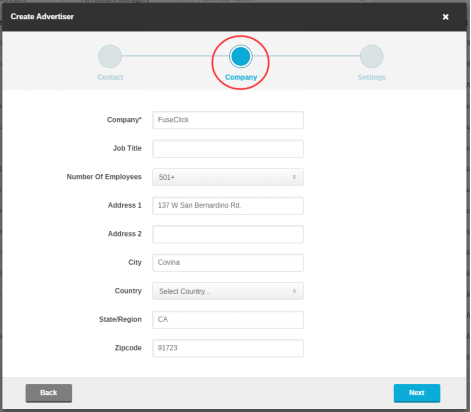
(Figure 3: Fill in Advertiser company info. Company field is the required. )
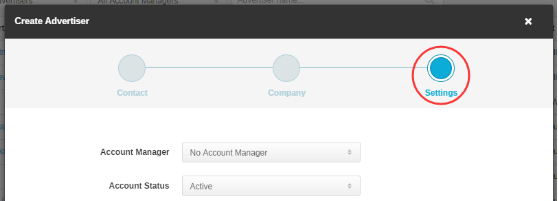
(Figure 4: Select an account manager for advertiser in network, also advertiser status.)

(Figure 5: Go to Advertiser detail page by clicking advertiser’s name, you can change advertiser information here.)
2. Create and Test Offers
2.1 Create Offer
Go to “Offer” management page and click on “Create” button to create a new offer. The steps are as follows:
(Figure 6: Go to Offer management page through Offer menu, create offer by clicking “Create” button.)
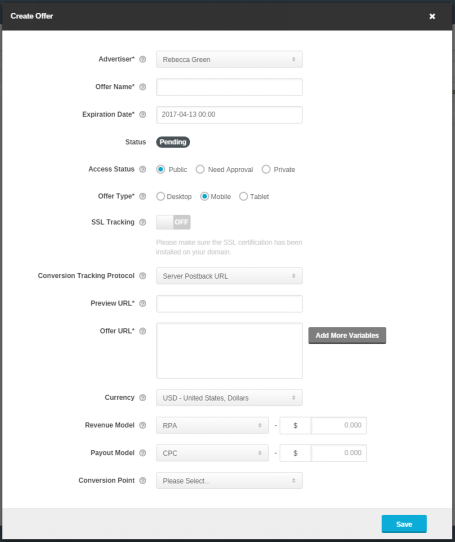
(Figure 7: Fill in Offer information.)
When you create an offer, you need to fill in offer related information like - “Advertiser、Offer Name、Expire Date、Access Status、Tracking Domain、Offer Type、Conversion Tracking Protocol、Preview URL、Lead Traffic to Preview URL、Offer URL、Currency、Revenue Model、Payout Model and Conversion Point”. We suggest you to choose Server Postback URL while selecting the Conversion Tracking Protocol. When you choose Postback URL, please make sure that the value of {tid} representing the Transaction ID is included in Offer URL, to ensure the successful conversion.

(Figure 8: Offer created and in pending status.)
2.2 Test Offer
Go to Offer detail page, you can find Test Offer button:
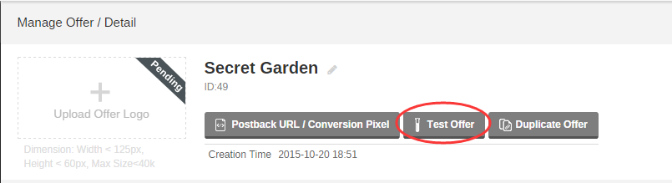
(Figure 9: Test Offer)
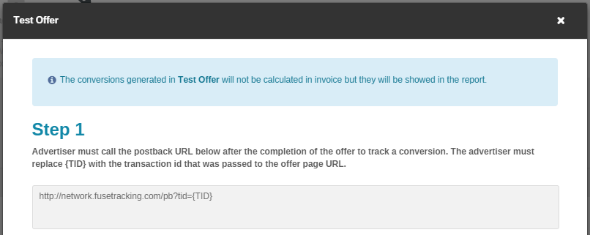
(Figure 10: Test offer by following instructions)
The conversion generated during the Test Offer will only be displayed in “Reports > Test Report” and won’t be calculated in Invoices. Test Steps are as follows:
(1) Step 1: Please send the Pixel or Postback URL which displayed on the page to Advertiser, so Advertiser can place it to conversion page or configure it on their server.
(2) Step 2: In order to guarantee the test accuracy, we suggest you to clear your web-browser’s Cookies first. Then open the test URL provided by system in your web-browser.
The URL format is like:
http://network.fusetracking.com/tl?a=1&o=8&aff_test=1.
(3)Step3: Click the “View Results” in Test Offer to check the Click and Conversion status. You can also view it in Report. Please note that the Affiliate here in the Test link is only for offer testing, it doesn’t really exist in Network. If there are multi-events in this offer, you can test them as well according your need.
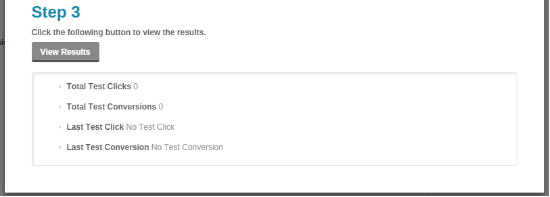
(Figure 11: View the results of the Test)
If your Offer finished the test and ready to run, you can go to the “Offers” management page, click URL to detail page, then click “Approve” button to activate this offer.

(Figure 12: “Approve” on the upper-right)

(Figure 13: Offer has been activated)
3. Create Account for Affiliate
Create Affiliate Account
Go to “Affiliate” management page, click “Create” to create an account for Affiliate. Operation logic is similar to “Create Advertiser”. During the process please note:
(1)In Contact Info, only “First Name, Email, Password, Confirm Password” fields are required.
(2)In Company Info, only “Company” field is required.
(3)for the last step:
A. Account manager: specified Affiliate manager.
B. Account Status: specified Affiliate account status. The account can have one of the following statuses:
I. Pending - If you have some consideration or haven’t finished filling up the Affiliate info, you can set Account status as pending, under this status Affiliate can’t use this account.
II. Active - the Affiliate account is active, Affiliate can access it using username and password. An automated email notification will be sent to Affiliate, you can edit and set email in “Setup>Email Template>Affiliate Template” .
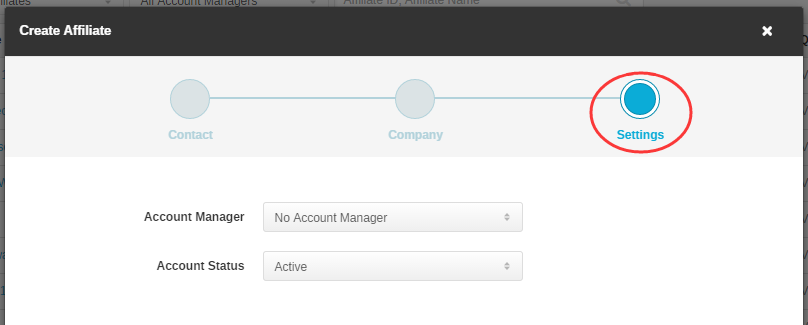
(Figure 14: Set Affiliate specified manager, and account status.)
4. Get and Test Affiliate Tracking Link
When you want to get Tracking Link for Affiliate, you can go to “Affiliate > Tracking Link” Tab:
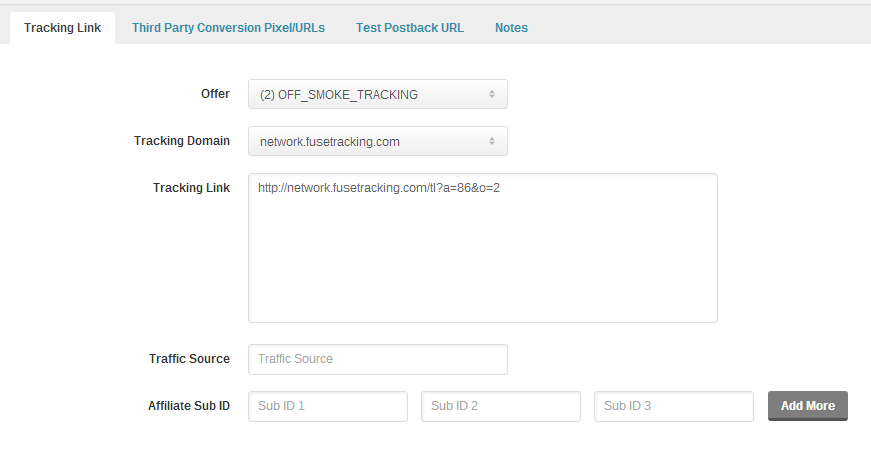
(Figure 15: Get Tracking Link)
To get the Tracking link, Follow the below steps:
(1)Select the Offer for which you want to get Tracking Link.
(2)Click “Generate Tracking Link” to build a Campaign connection between Affiliate and Offer. The Link will be displayed in “Tracking Link” Textbox.
Once you built the Campaign, next time when you go to the page you can get the Tracking Link directly, no need to generate the Tracking Link again.
(3)After you get the basic Tracking Link, you can add more parameters such as Traffic Source, Affiliate Sub ID, etc. For example, you prepare to launch an Offer on Facebook, aiming to female, age from 25 to 50.
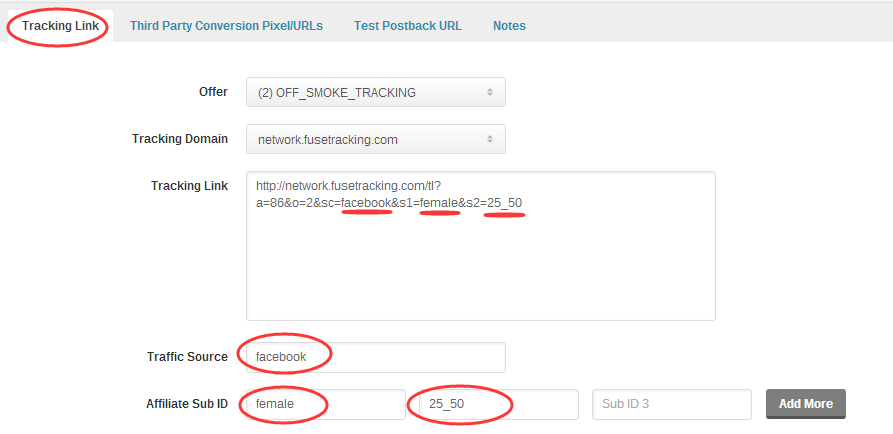
(Figure 16: Add Traffic Source, Sub IDs)
(4)When the Tracking link is set, please send it to Affiliates in order for them to set it as offer link and then the Offer is ready to run. The date recorded during this operation can be viewed in the Report.
Further to this, you can send data to FuseClick system using the Affiliate system parameter transmission function. Please read for more details: <Affiliate Integration Guide>.
5. Affiliate Commission Payment
When Affiliate generated the data matches with Network payment criteria, The Network will generate Invoices in two ways: Automatically Billing and Manually Billing.
5.1 Auto-Generate Affiliate Invoices:
FuseClick will Auto-Generate Invoices based on your setting of following 3 items:
(1)Affiliate Invoice Frequency: Payment cycle for Affiliate.
You can set it in Affiliate management tab. Select an affiliate and go to detail page:
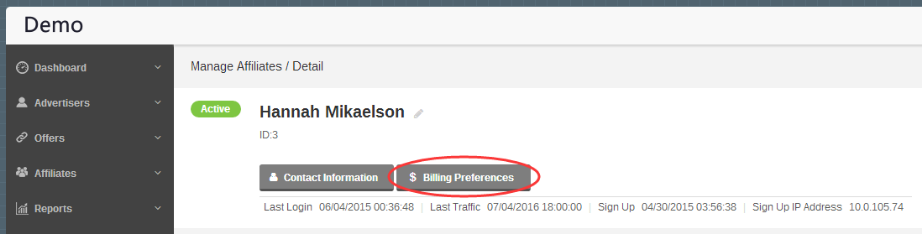
(Figure 17:Click “Billing Preferences” in Affiliate detail page)
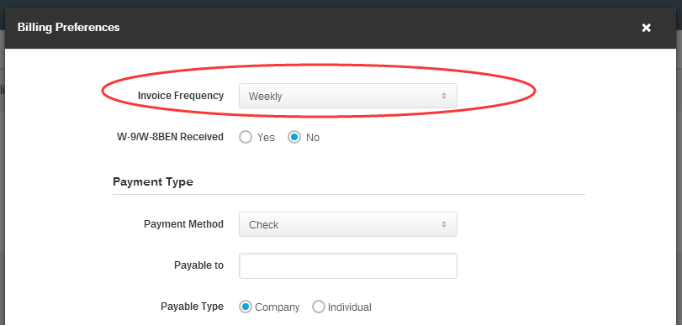
(Figure 18: In “Billing Preferences” window, set the Invoice Frequency for the current affiliate)
(2)Minimum Invoice Threshold: Network’s minimum payment limitation.
Go to “Setup > Setting > Affiliate Panel Settings” to set this information:
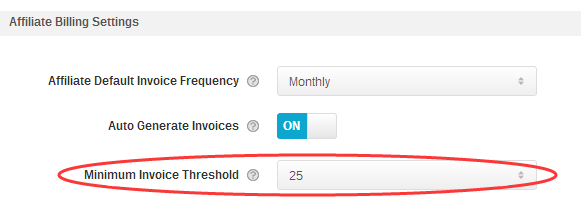
(Figure 19: set Network’s minimum payment)
(3)Auto Generate Invoices:Set this option ON to generate invoices automatically, when affiliate’s amount of payout meets the Network’s minimum payment limitation.
Go to “Setup > Setting > Affiliate Panel Settings” to set this:
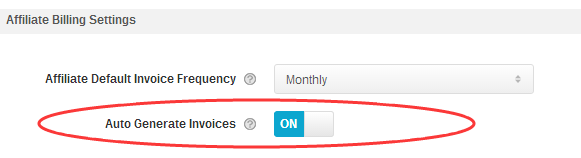
(Figure 20: set Auto-Generate Invoice)
5.2 Manually-Generate Affiliate Invoices:
You can manually generate Affiliate Invoices, for this the invoice doesn’t need to meet the Network’s minimum payment criteria.
Go to “Billings > Affiliate Billings” to set this:
(1)Click “Create Invoice” on the upper-right at the page.
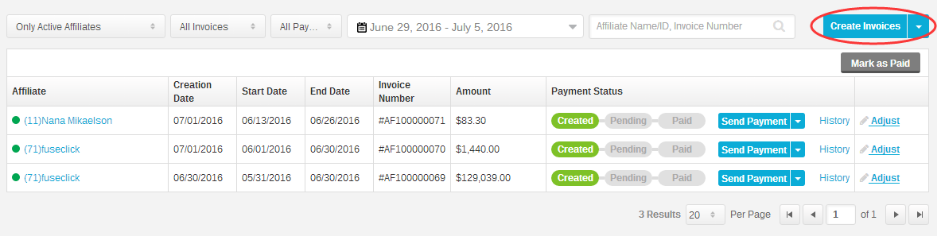
(Figure 21: Click Create Invoice)

(Figure 22: choose affiliate and the starting& ending time of invoice)
(3)Click “Refresh” to search the Offer conversions which have not generate any invoices during a selected period. Classify them by currency types and then pre-generate the invoice. In this pre-generate invoice:
A. If you don’t want to pay specific Offer or corresponding conversion, you can delete it in the list.
B. When advertiser’s offer have extra motivation strategy, or the Network need to deduct extra Conversion, Clicks or Sales, you can adjust this in pre-generate invoice.
C. You can add notes in pre-generate invoice, for example Priority payments.
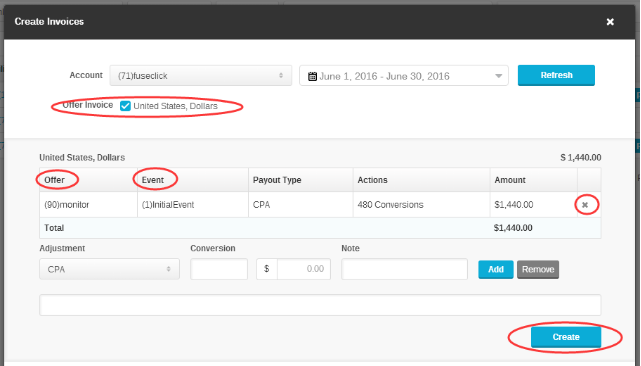
(Figure 23: choose currency, pre-generate Invoice)
(4)Click “Create” and it will generate the invoice with 11 numbers and AF initial. You can choose “Cancel Invoice” to cancel the generating invoices and go back to previous page, or click “Billing Page” link to go to Affiliate all invoice management page.
5.3 Affiliate Invoice Payment Process
Affiliate Invoice conventional payment process is: Created - Pending - Paid. Only the paid bill can be seen by Affiliate.

(Figure 24: Conventional invoice payment process)
In Network login on page, Affiliates can login on the system using their username and password then Go to “Payments” page to check the payments.
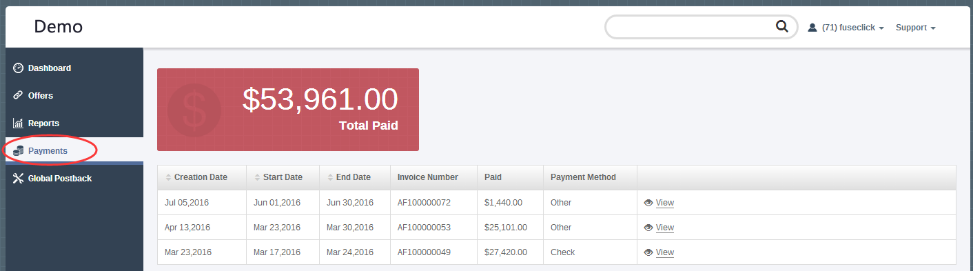
(Figure 25: Affiliate login on system to check their payments)
1. Create Advertiser
You can go to “Advertiser” management interface and click on “Create” button to create an advertiser. The steps are as follows:
(Figure 1: Go to “Advertiser” management interface, click “Create”)
(Figure 2: Fill in Advertiser info. Only “First Name、Email、Password、Confirm Password” fields are required.)
(Figure 3: Fill in Advertiser company info. Company field is the required. )
(Figure 4: Select an account manager for advertiser in network, also advertiser status.)
(Figure 5: Go to Advertiser detail page by clicking advertiser’s name, you can change advertiser information here.)
2. Create and Test Offers
2.1 Create Offer
Go to “Offer” management page and click on “Create” button to create a new offer. The steps are as follows:
(Figure 6: Go to Offer management page through Offer menu, create offer by clicking “Create” button.)
(Figure 7: Fill in Offer information.)
When you create an offer, you need to fill in offer related information like - “Advertiser、Offer Name、Expire Date、Access Status、Tracking Domain、Offer Type、Conversion Tracking Protocol、Preview URL、Lead Traffic to Preview URL、Offer URL、Currency、Revenue Model、Payout Model and Conversion Point”. We suggest you to choose Server Postback URL while selecting the Conversion Tracking Protocol. When you choose Postback URL, please make sure that the value of {tid} representing the Transaction ID is included in Offer URL, to ensure the successful conversion.
(Figure 8: Offer created and in pending status.)
Lead Traffic to Preview URL is the customize function,if you want use it,please contact with our BD or AM.
2.2 Test Offer
Go to Offer detail page, you can find Test Offer button:
(Figure 9: Test Offer)
(Figure 10: Test offer by following instructions)
(1) Step 1: Please send the Pixel or Postback URL which displayed on the page to Advertiser, so Advertiser can place it to conversion page or configure it on their server.
(2) Step 2: In order to guarantee the test accuracy, we suggest you to clear your web-browser’s Cookies first. Then open the test URL provided by system in your web-browser.
The URL format is like:
http://network.fusetracking.com/tl?a=1&o=8&aff_test=1.
(3)Step3: Click the “View Results” in Test Offer to check the Click and Conversion status. You can also view it in Report. Please note that the Affiliate here in the Test link is only for offer testing, it doesn’t really exist in Network. If there are multi-events in this offer, you can test them as well according your need.
(Figure 11: View the results of the Test)
If your Offer finished the test and ready to run, you can go to the “Offers” management page, click URL to detail page, then click “Approve” button to activate this offer.
(Figure 12: “Approve” on the upper-right)
(Figure 13: Offer has been activated)
Create Affiliate Account
Go to “Affiliate” management page, click “Create” to create an account for Affiliate. Operation logic is similar to “Create Advertiser”. During the process please note:
(1)In Contact Info, only “First Name, Email, Password, Confirm Password” fields are required.
(2)In Company Info, only “Company” field is required.
(3)for the last step:
A. Account manager: specified Affiliate manager.
B. Account Status: specified Affiliate account status. The account can have one of the following statuses:
I. Pending - If you have some consideration or haven’t finished filling up the Affiliate info, you can set Account status as pending, under this status Affiliate can’t use this account.
II. Active - the Affiliate account is active, Affiliate can access it using username and password. An automated email notification will be sent to Affiliate, you can edit and set email in “Setup>Email Template>Affiliate Template” .
(Figure 14: Set Affiliate specified manager, and account status.)
4. Get and Test Affiliate Tracking Link
When you want to get Tracking Link for Affiliate, you can go to “Affiliate > Tracking Link” Tab:
(Figure 15: Get Tracking Link)
To get the Tracking link, Follow the below steps:
(1)Select the Offer for which you want to get Tracking Link.
(2)Click “Generate Tracking Link” to build a Campaign connection between Affiliate and Offer. The Link will be displayed in “Tracking Link” Textbox.
Once you built the Campaign, next time when you go to the page you can get the Tracking Link directly, no need to generate the Tracking Link again.
(3)After you get the basic Tracking Link, you can add more parameters such as Traffic Source, Affiliate Sub ID, etc. For example, you prepare to launch an Offer on Facebook, aiming to female, age from 25 to 50.
(Figure 16: Add Traffic Source, Sub IDs)
Further to this, you can send data to FuseClick system using the Affiliate system parameter transmission function. Please read for more details: <Affiliate Integration Guide>.
5. Affiliate Commission Payment
When Affiliate generated the data matches with Network payment criteria, The Network will generate Invoices in two ways: Automatically Billing and Manually Billing.
5.1 Auto-Generate Affiliate Invoices:
FuseClick will Auto-Generate Invoices based on your setting of following 3 items:
(1)Affiliate Invoice Frequency: Payment cycle for Affiliate.
You can set it in Affiliate management tab. Select an affiliate and go to detail page:
(Figure 17:Click “Billing Preferences” in Affiliate detail page)
(Figure 18: In “Billing Preferences” window, set the Invoice Frequency for the current affiliate)
Go to “Setup > Setting > Affiliate Panel Settings” to set this information:
(Figure 19: set Network’s minimum payment)
(3)Auto Generate Invoices:Set this option ON to generate invoices automatically, when affiliate’s amount of payout meets the Network’s minimum payment limitation.
Go to “Setup > Setting > Affiliate Panel Settings” to set this:
(Figure 20: set Auto-Generate Invoice)
5.2 Manually-Generate Affiliate Invoices:
You can manually generate Affiliate Invoices, for this the invoice doesn’t need to meet the Network’s minimum payment criteria.
Go to “Billings > Affiliate Billings” to set this:
(1)Click “Create Invoice” on the upper-right at the page.
(Figure 21: Click Create Invoice)
(2)When you create invoice, you need to select start and end date intervals for this invoice:
(Figure 22: choose affiliate and the starting& ending time of invoice)
A. If you don’t want to pay specific Offer or corresponding conversion, you can delete it in the list.
B. When advertiser’s offer have extra motivation strategy, or the Network need to deduct extra Conversion, Clicks or Sales, you can adjust this in pre-generate invoice.
C. You can add notes in pre-generate invoice, for example Priority payments.
(Figure 23: choose currency, pre-generate Invoice)
(4)Click “Create” and it will generate the invoice with 11 numbers and AF initial. You can choose “Cancel Invoice” to cancel the generating invoices and go back to previous page, or click “Billing Page” link to go to Affiliate all invoice management page.
5.3 Affiliate Invoice Payment Process
Affiliate Invoice conventional payment process is: Created - Pending - Paid. Only the paid bill can be seen by Affiliate.
(Figure 24: Conventional invoice payment process)
(Figure 25: Affiliate login on system to check their payments)
Close All
Getting Started
Anti-Fraud System
Auto
SmartLlink
Configuration Guide
Integration with FuseClick
Partner Integration with FuseClick
Employees
Advertisers
Offers
Affiliates
Campaigns
Reports
Billings
Tools
Test
Setup


